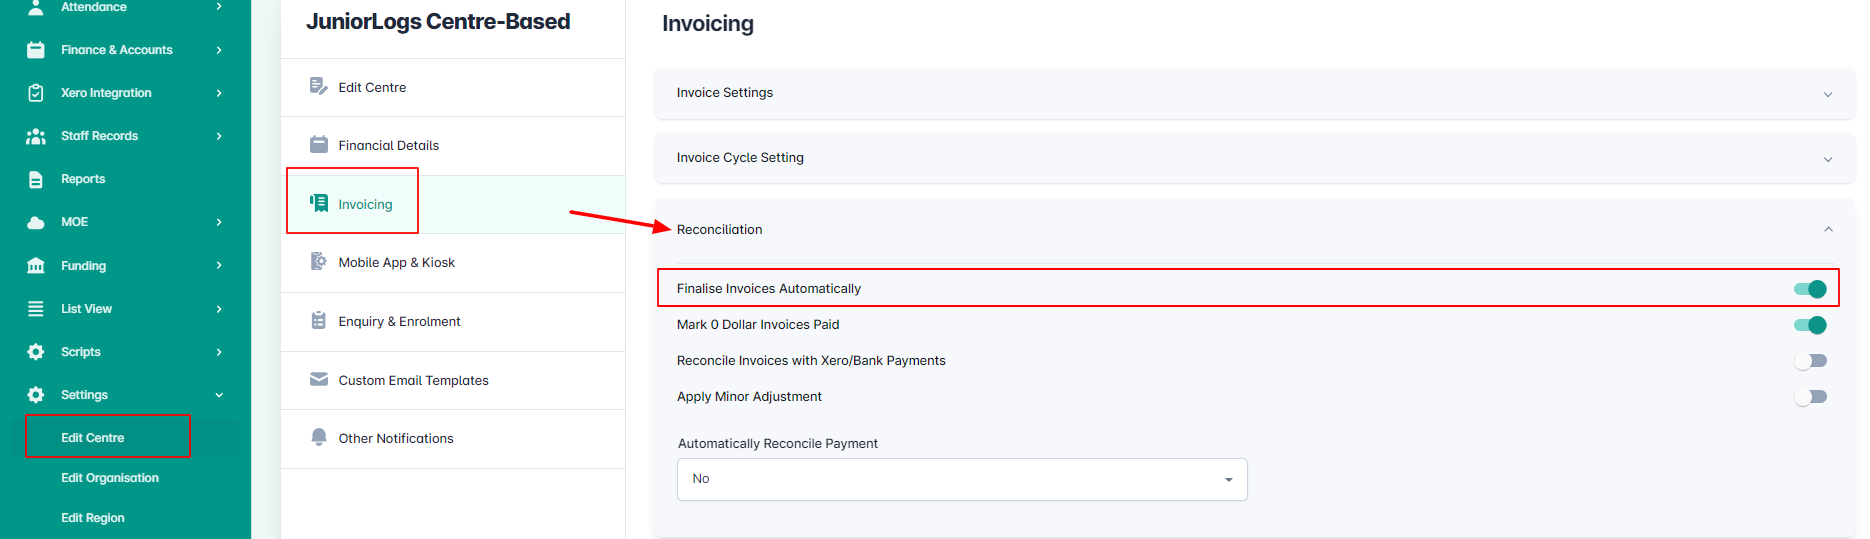
Under your Settings (left menu) > Edit Centre > Invoicing > Reconciliation tab, tick the Finalise Invoices Automatically option.
This will update and finalise your draft invoices (upon creation) automatically. On your invoices, the status of the invoices will be on awaiting payment, and the Email option is enabled already.
How to add carry over balance from another SMS:
1. Add Carry over balance directly on invoice:
Once the first invoicing round is ready, you can go to each child’s draft invoices, edit the invoice and add a new fee on the invoice.
- Click on the invoice and click Edit at the top right of the invoice.
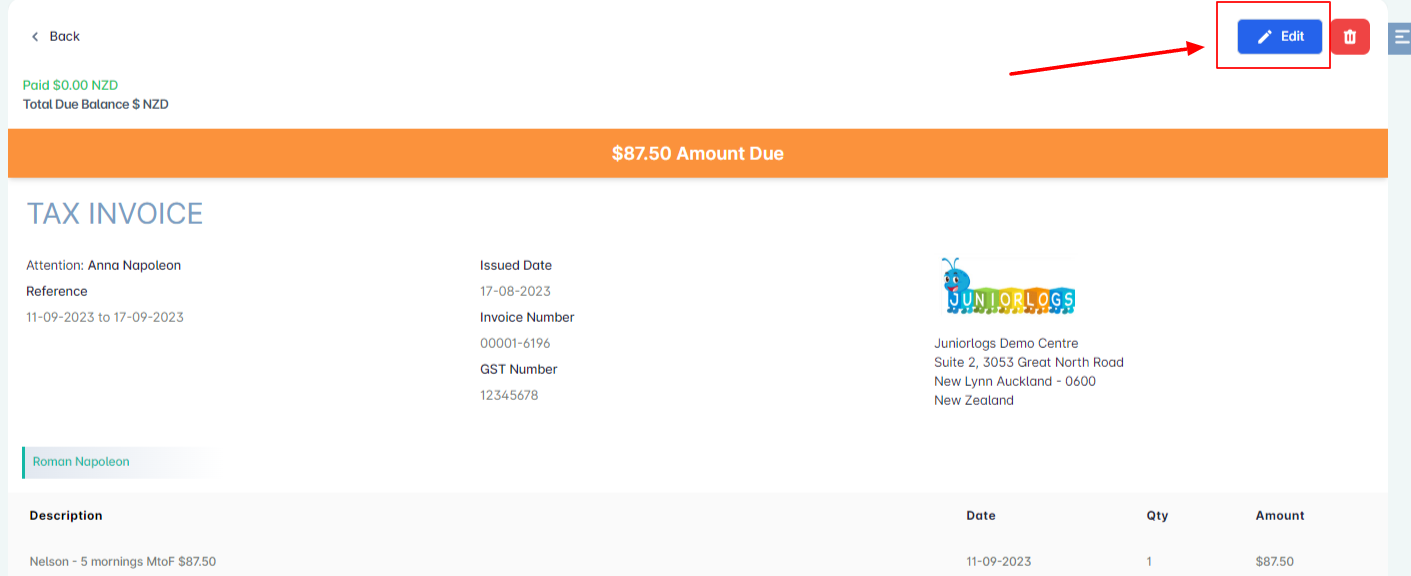
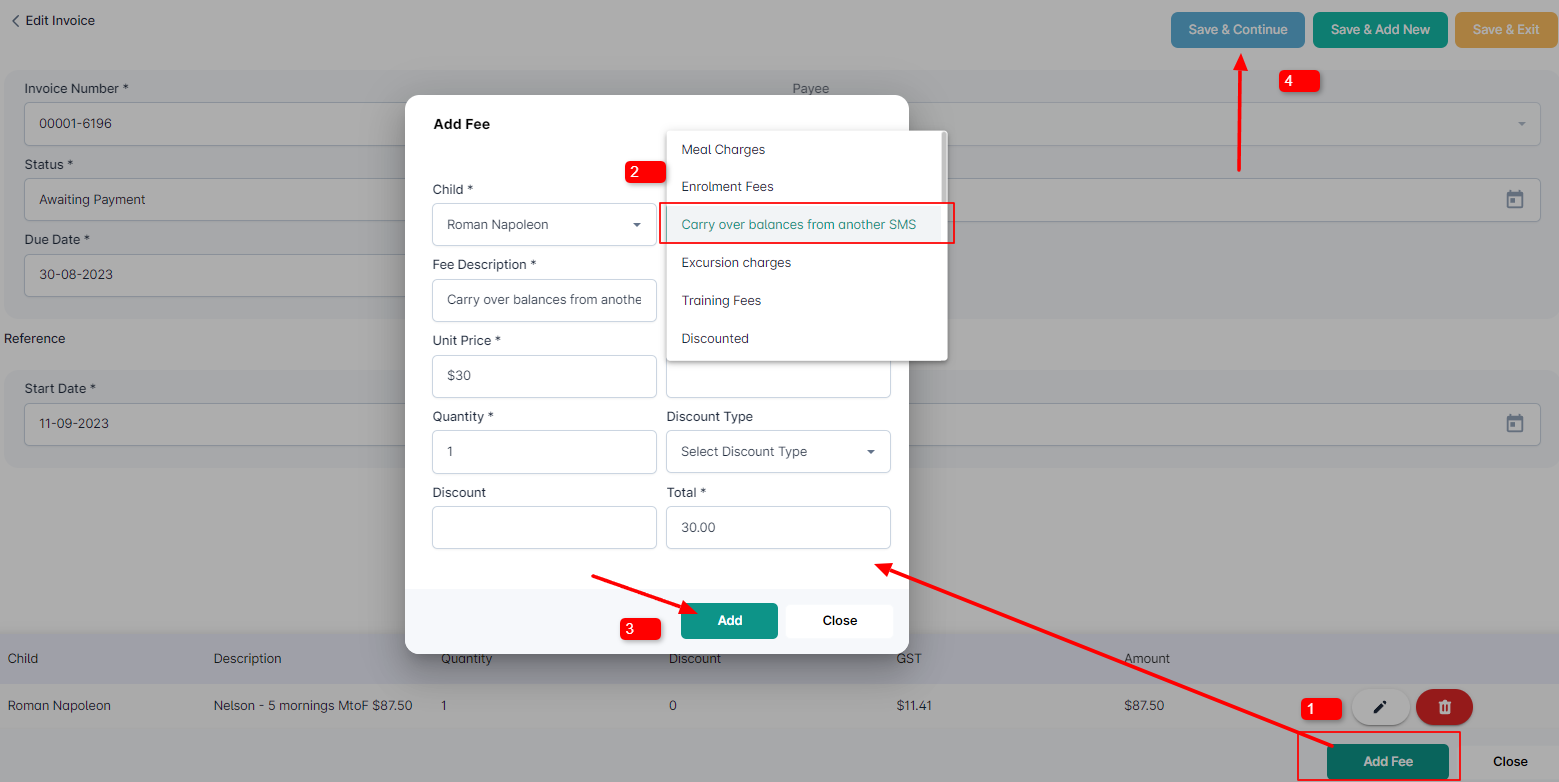
- Add fee > Select “Carry-over balances from another SMS” as this fee will already be added to your centre’s account by default.
- Click Save.
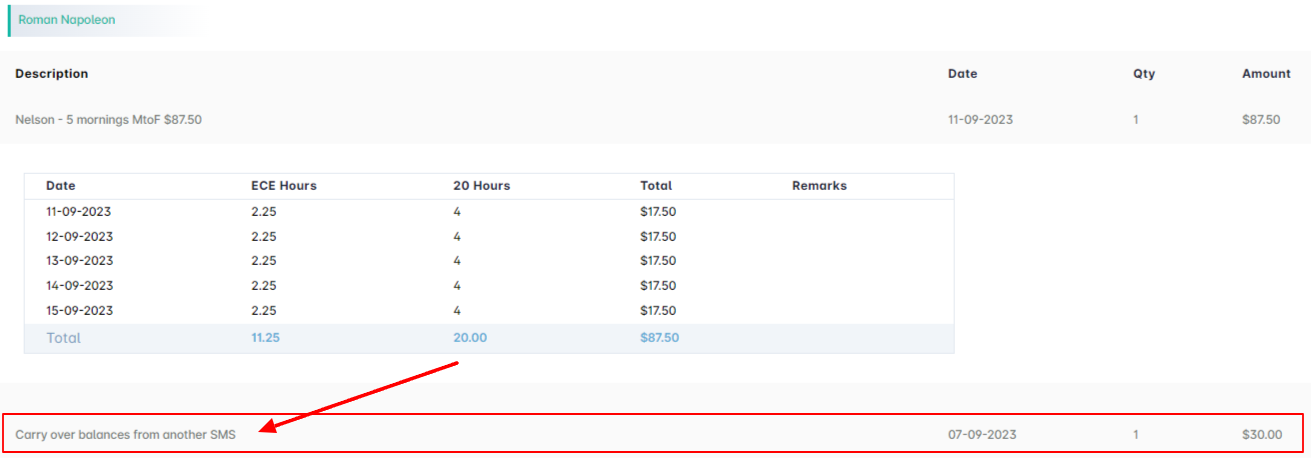
- Now the invoice will have an additional line item. (Current period invoice + Carry-over balance).
2. Add carry over balance with the first cycle of fees and generate invoice
- Go to the child’s records – Menu >List View/ Quick Links > Children
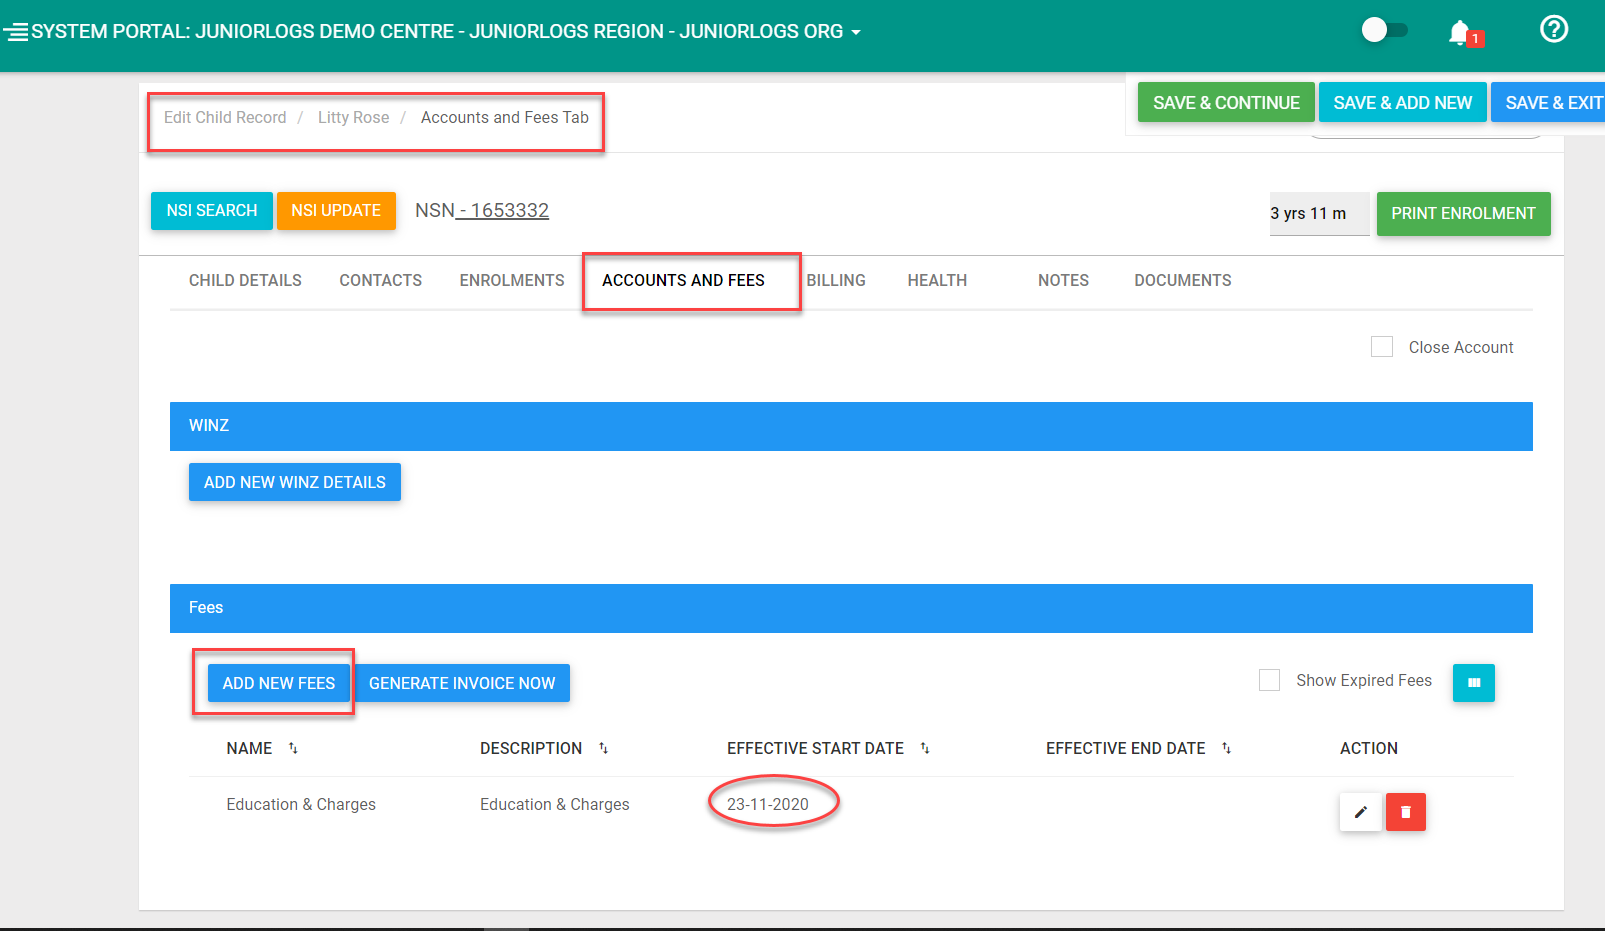
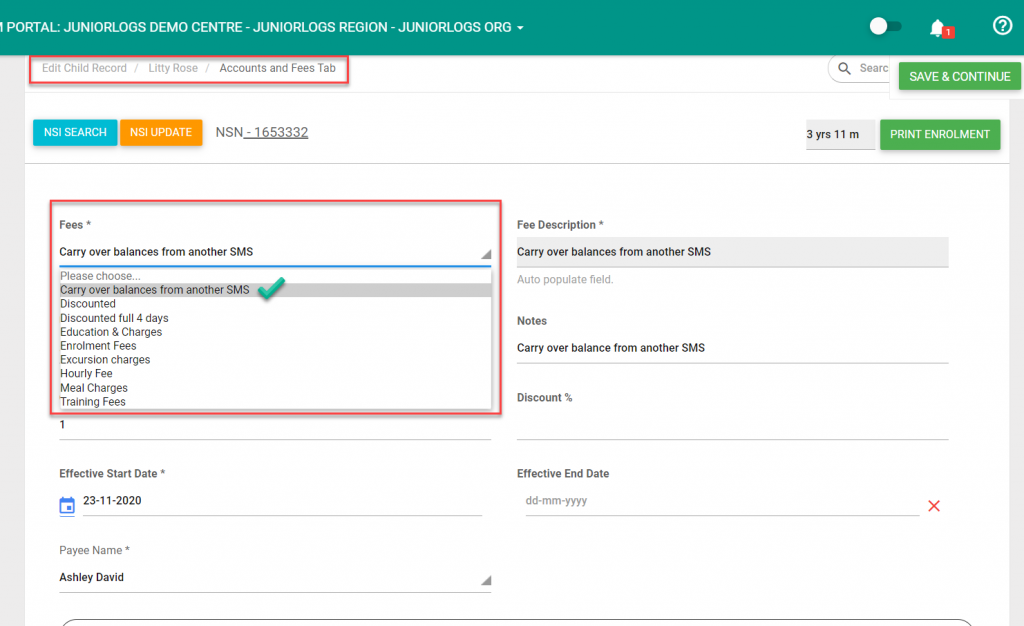
- Select Child > Accounts and Fees tab > Add New Fees button
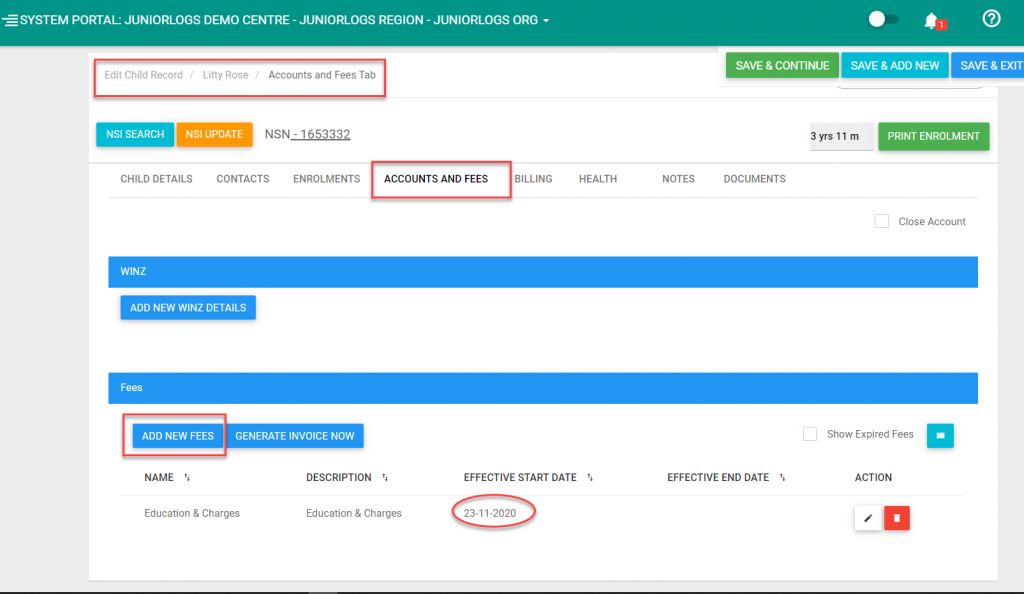
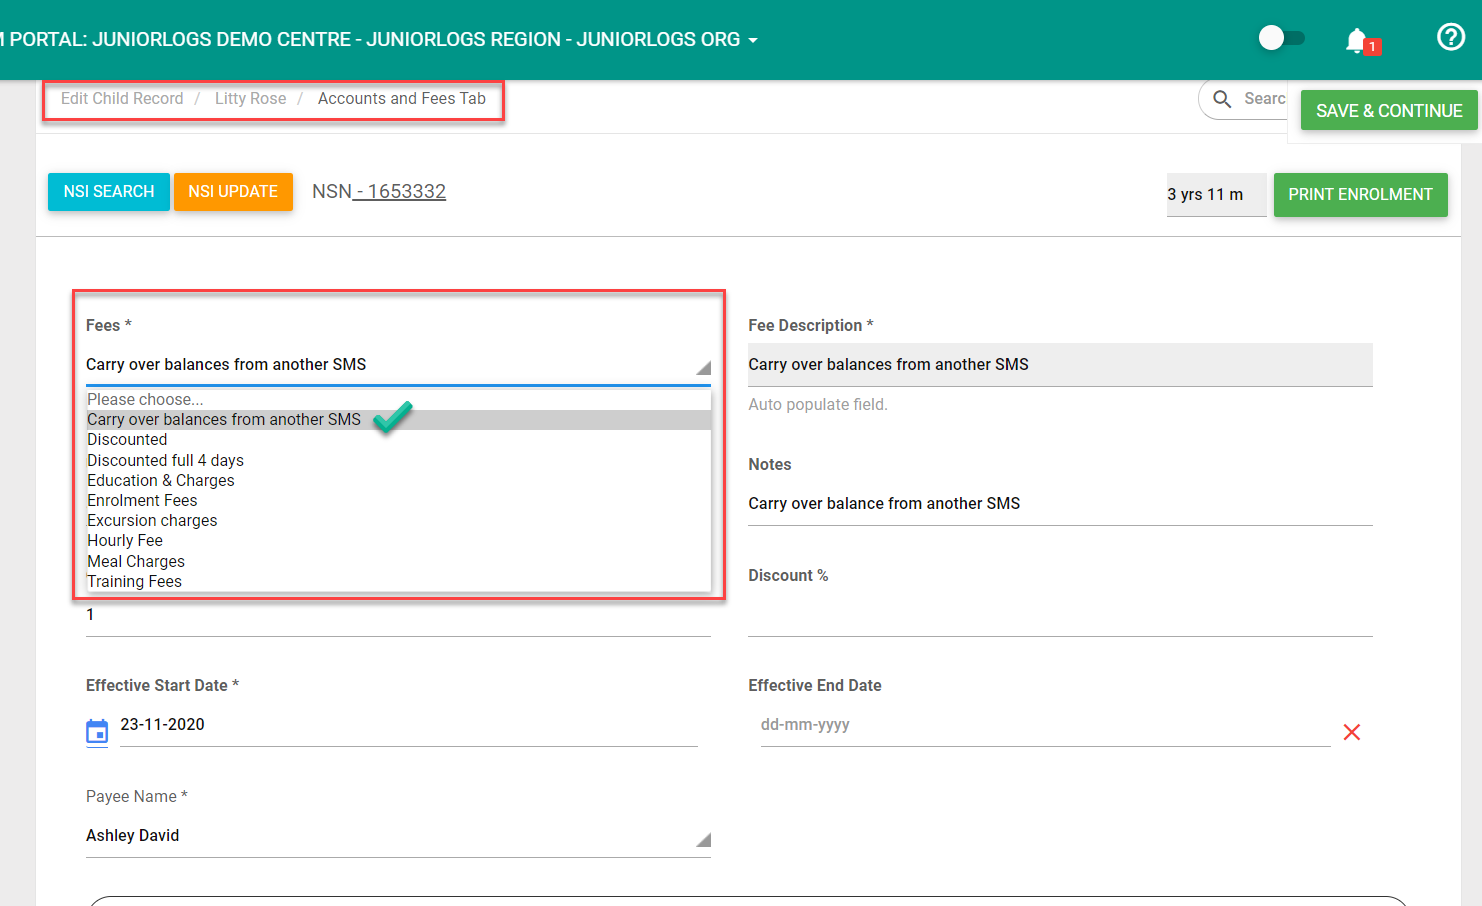
- Add New Fees: Select fee from dropdown – Carry over balance from another SMS
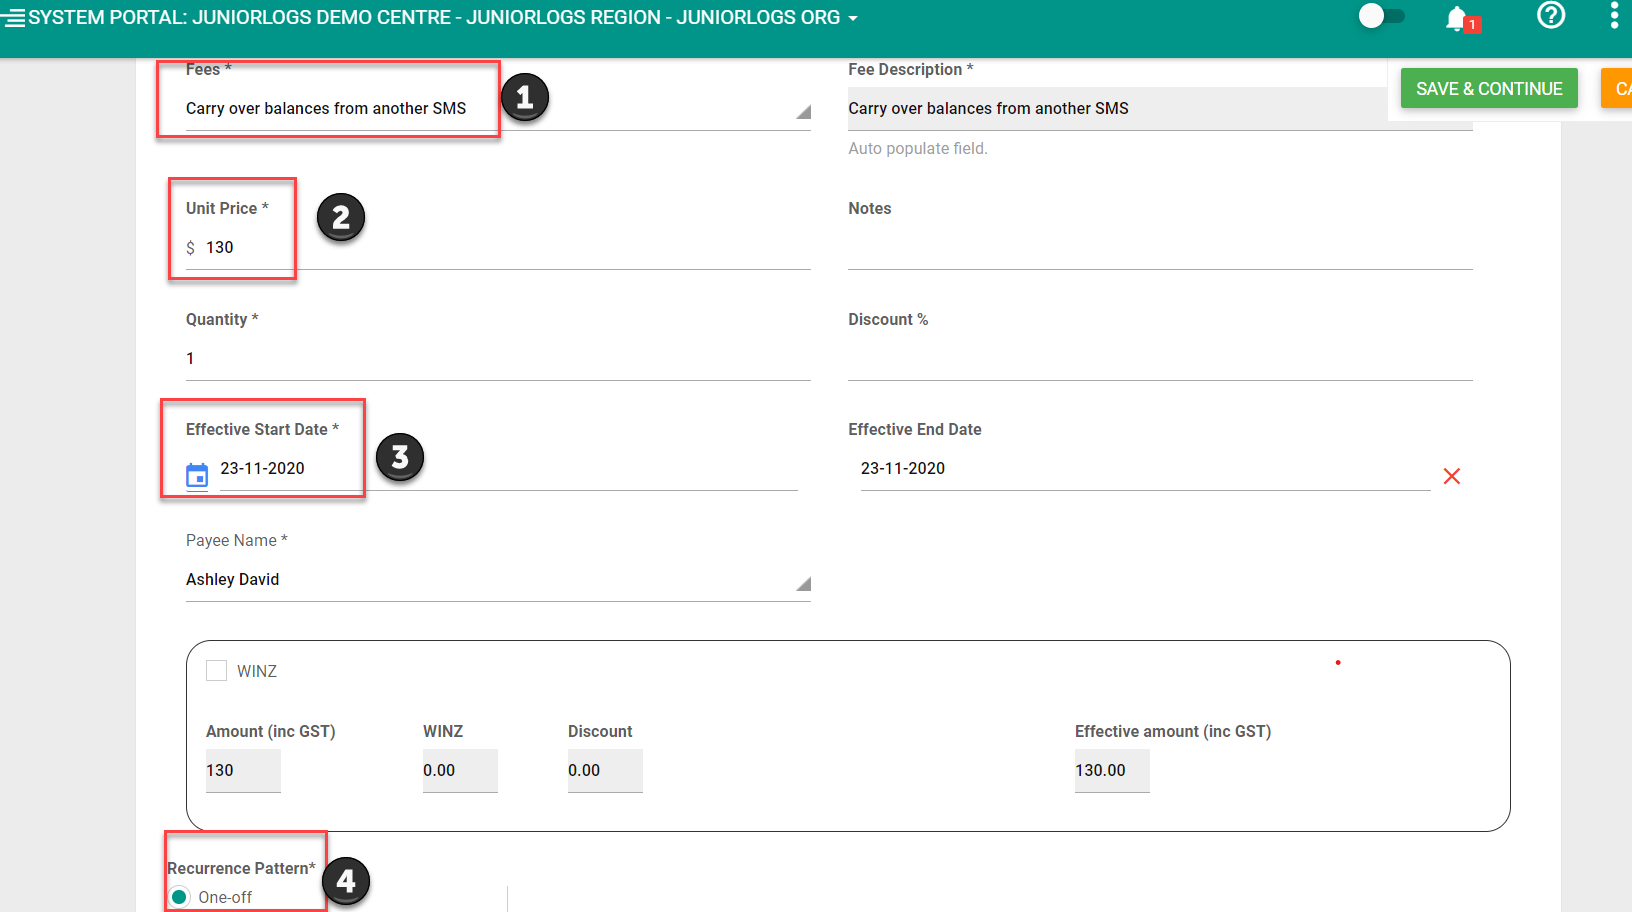
- Fill in all fields as shown below:
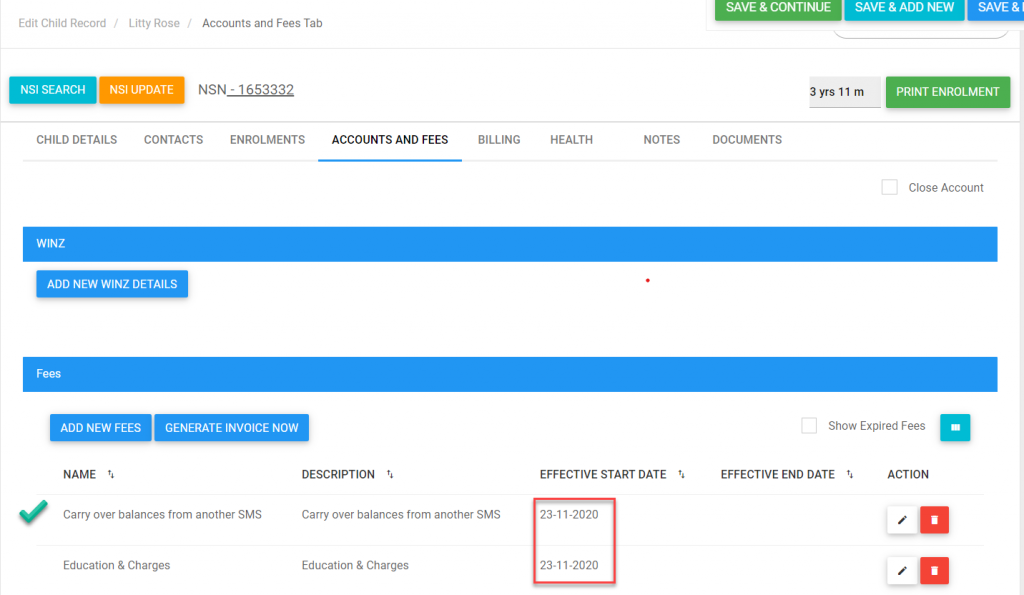
- Select the same date as the fee which is already created to add carryover balance to the same invoice .
- Select one-off button to generate fees only once.
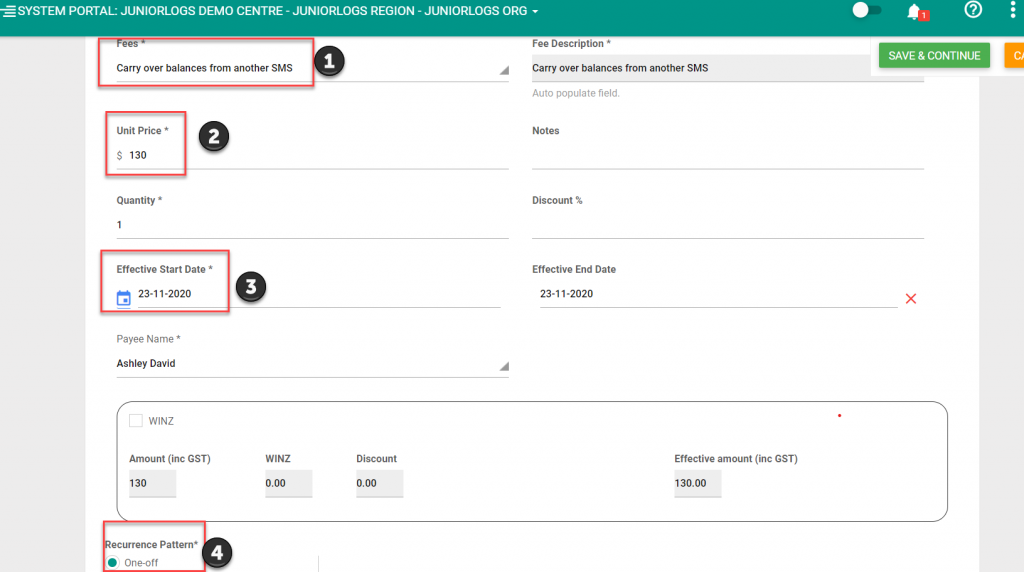
- Save and continue
- Once the invoices will be generated, you will be able to see the Carry over balance fee you have added.
- You can also recreate the invoice with the Carry over balance on it here: Menu > Finance and Accounts > Update and recreate invoice.
Login to Juniorlogs SMS
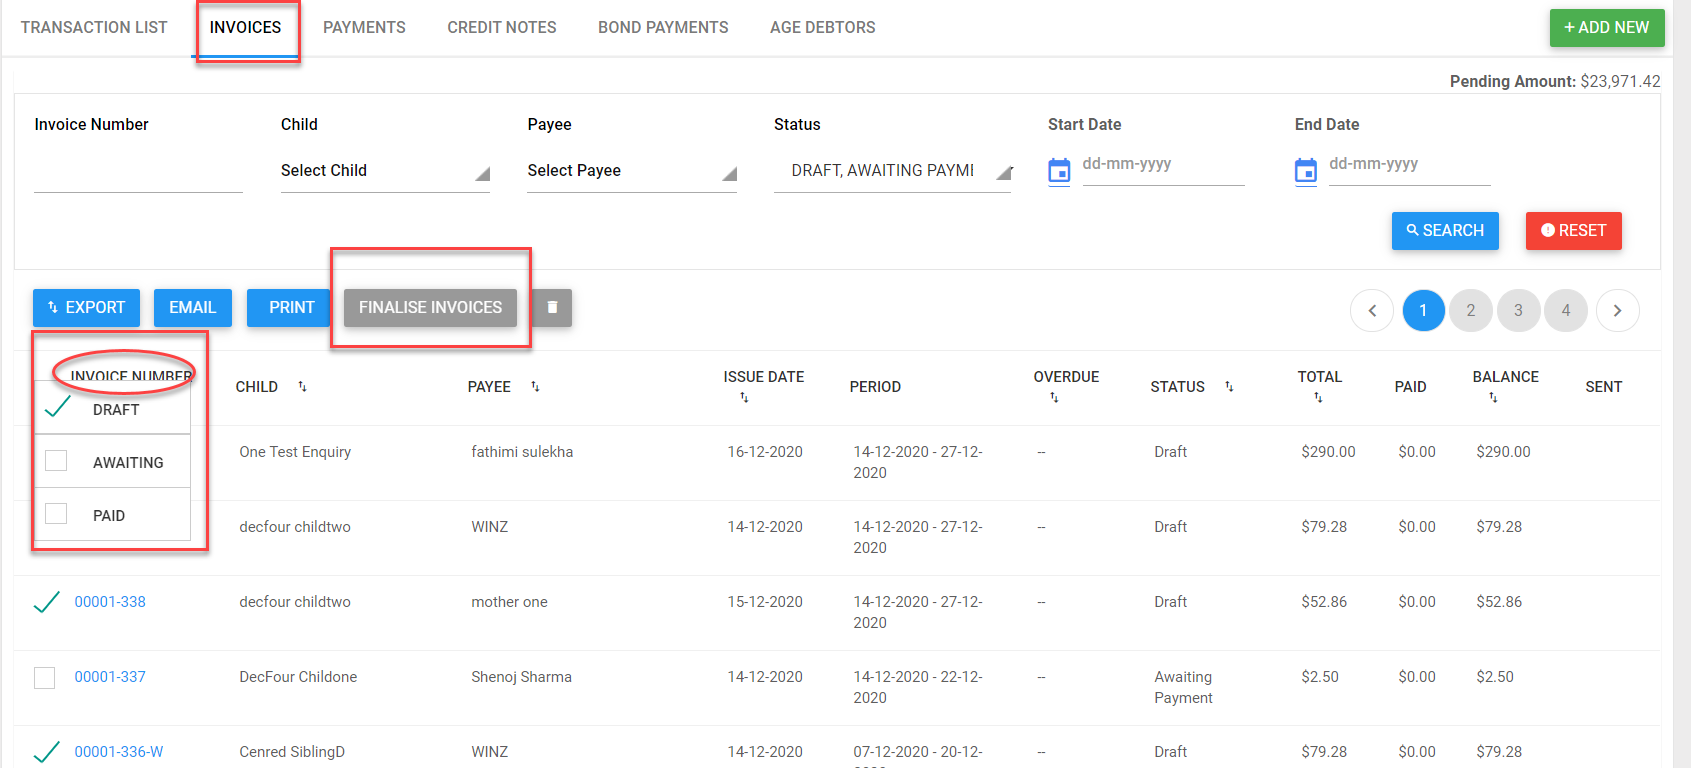
Menu > Finance and accounts > Select Invoices tab.
The invoices created will be in Draft Status
Or to do in bulk
- Click Invoice number checkbox and select Draft checkbox and click on Finalise Invoices button.
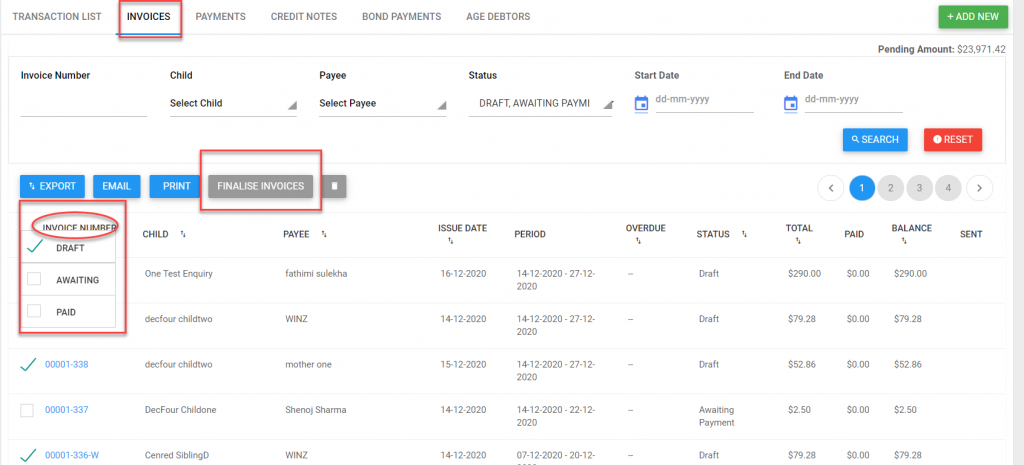
- The invoices in Draft status changes to Awaiting payment
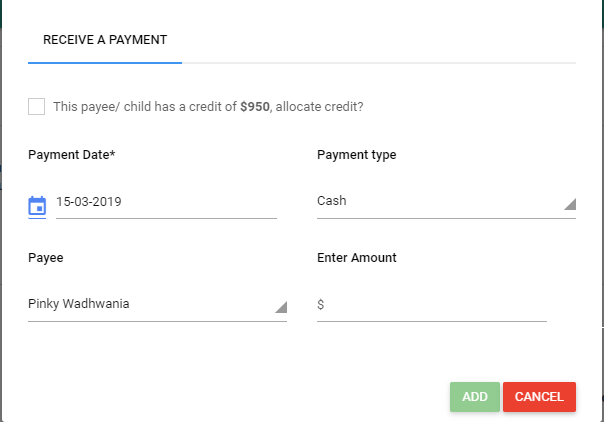
- To pay an invoice, Click on the receive payment and fill in the fields.
- We can apply payments to finalised (Awaiting payment) invoices only
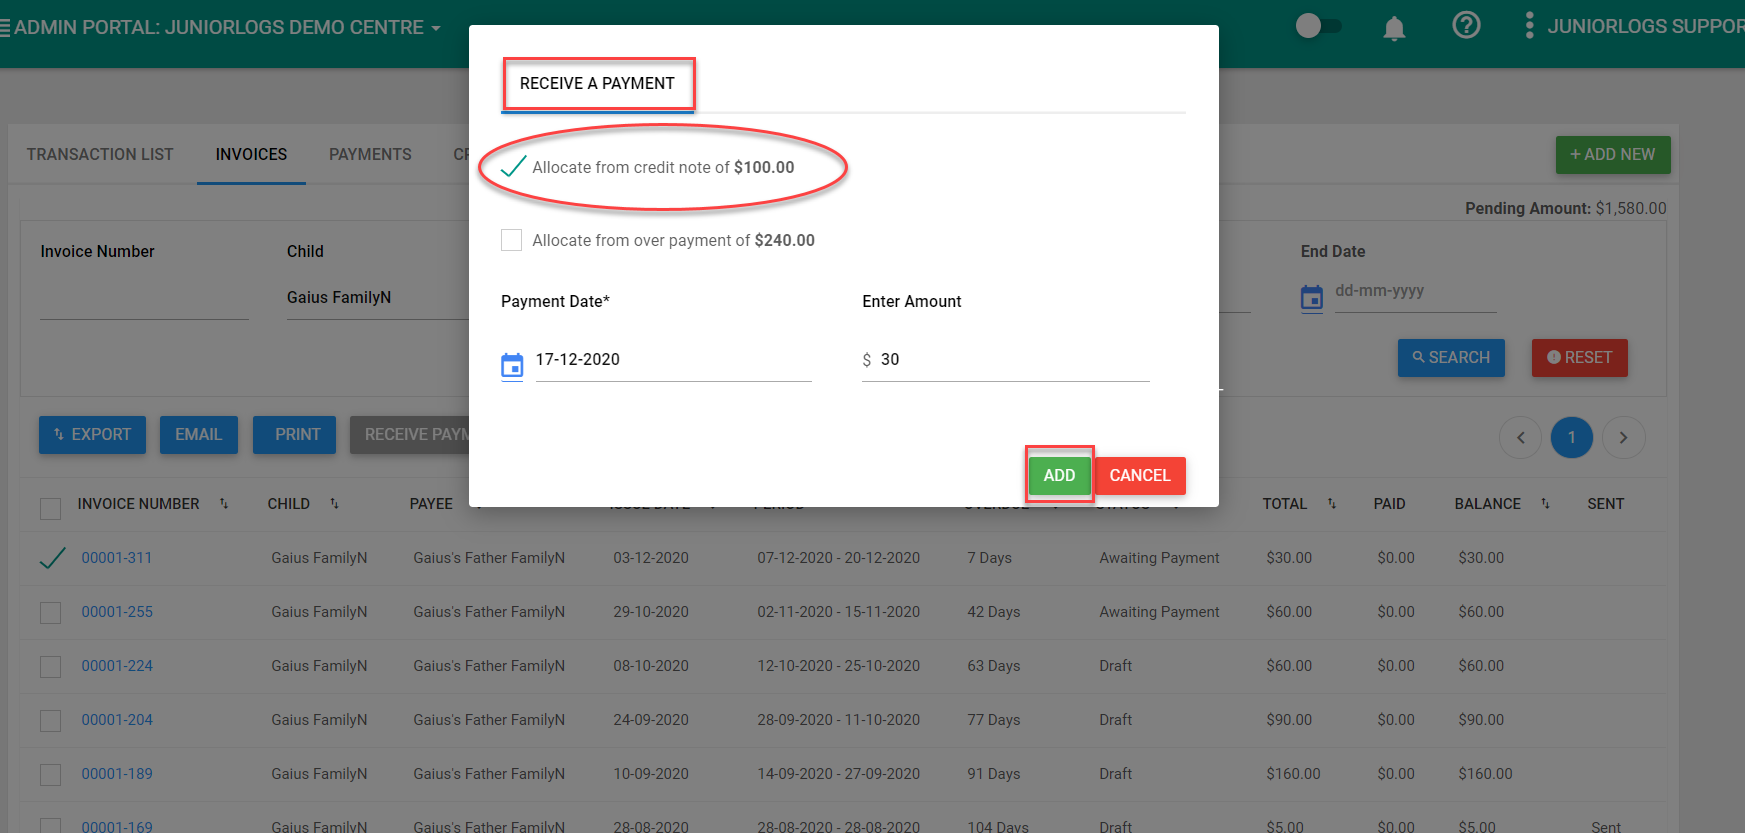
This pop-up will show you if the payee is in credit by as well.
- Select Email option to email the invoices and receive payments from parents
You can send account statements for each of your accounts through Transaction list.
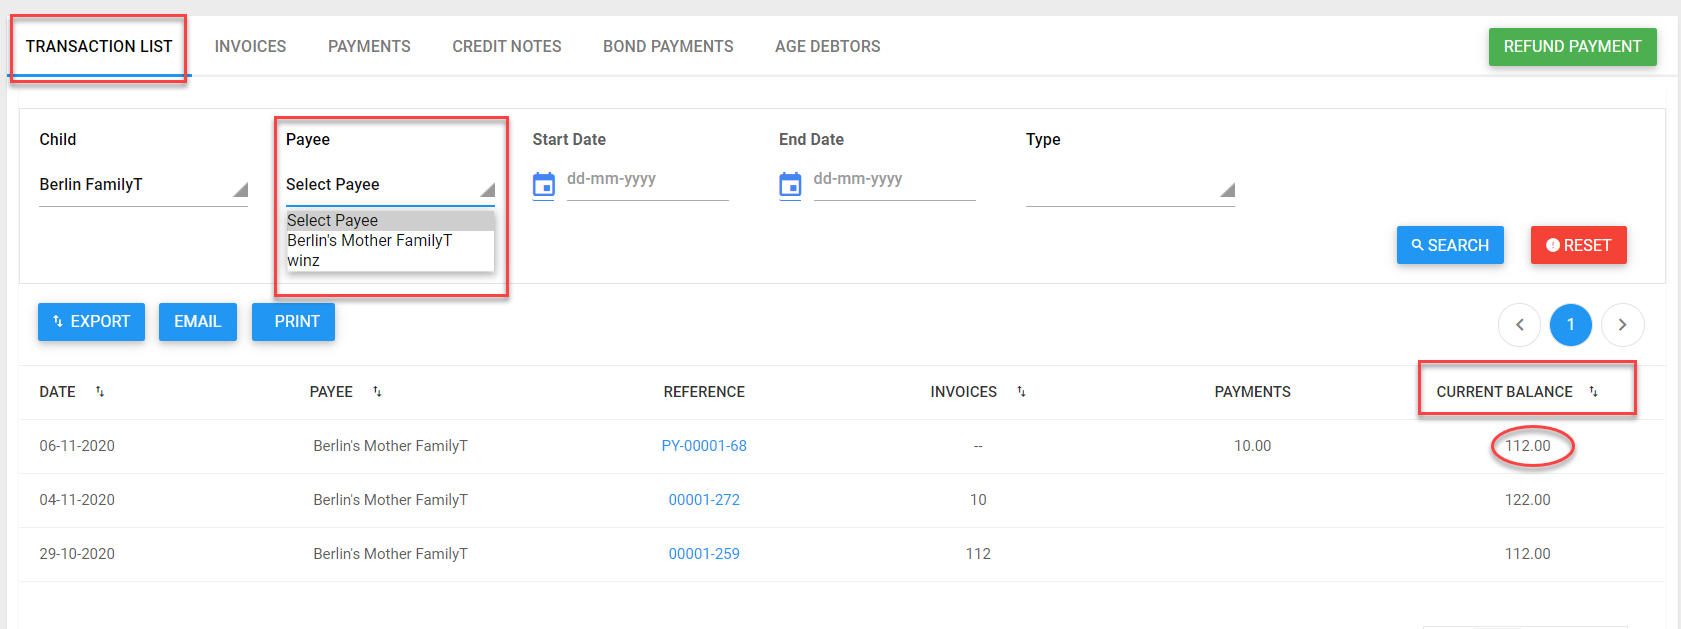
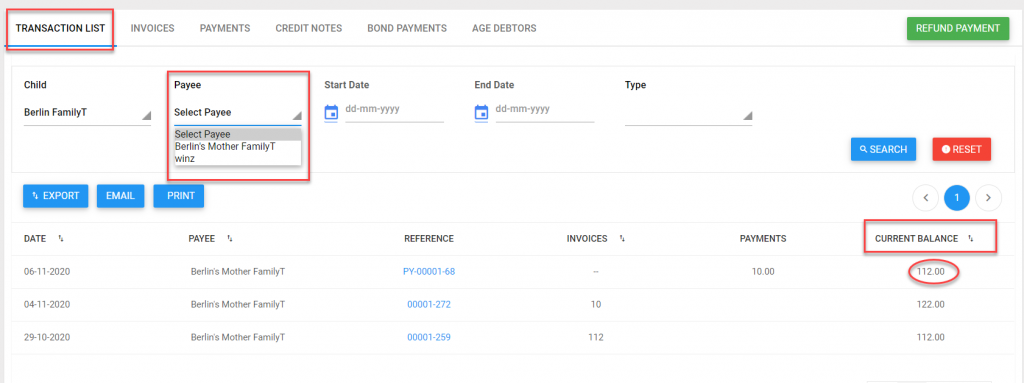
It displays all incoming and outgoing transactions that occur within your service. This list is displayed per payee and it can be further narrowed down using the date selection filter or whether you are after Invoice or Payment transactions.
Login to Juniorlogs
Menu > Finance & Accounts > Transaction List tab
- Select a payee from the drop down to narrow your search
(WINZ option is also available from the drop down)
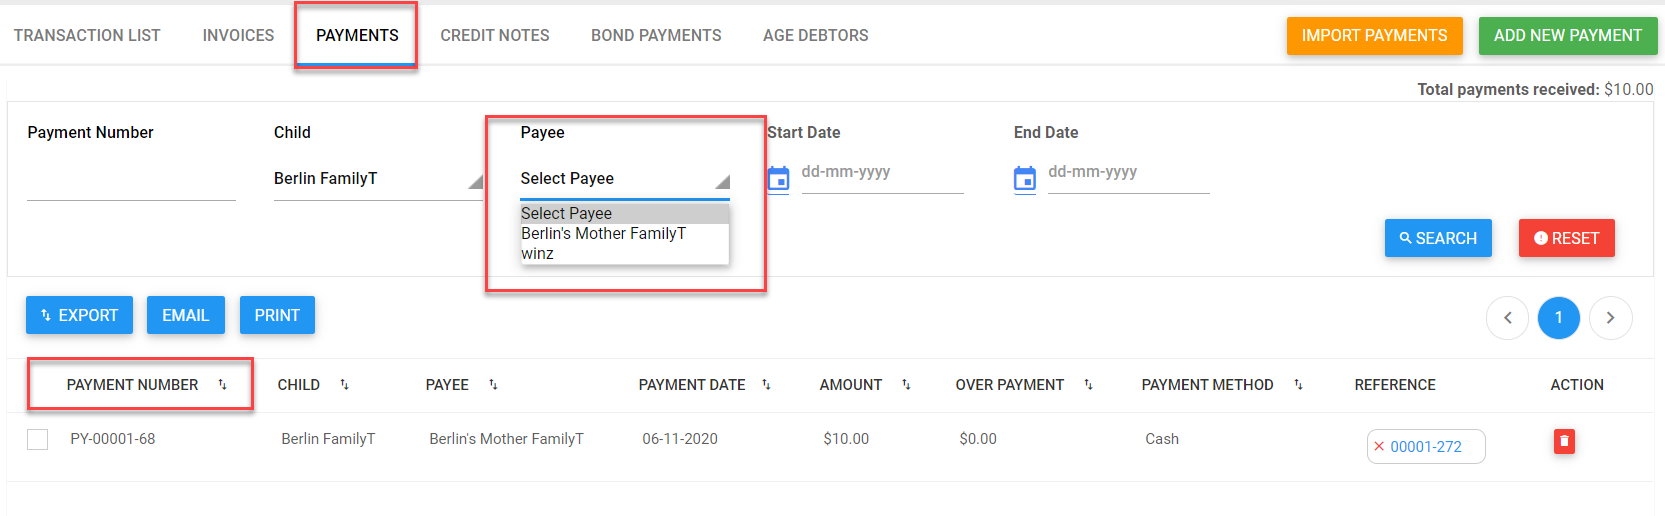
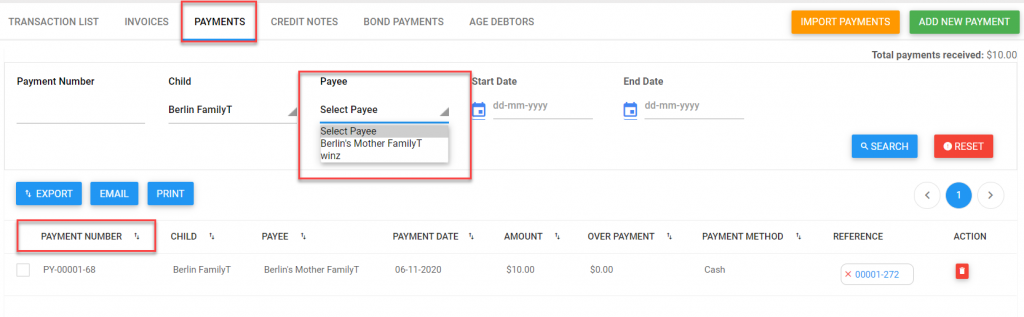
- To view the payment details, Select Payment tab
Payment details popup will display the invoice details like this shown below.
- To view the invoice number reference code, click on Reference (in blue).
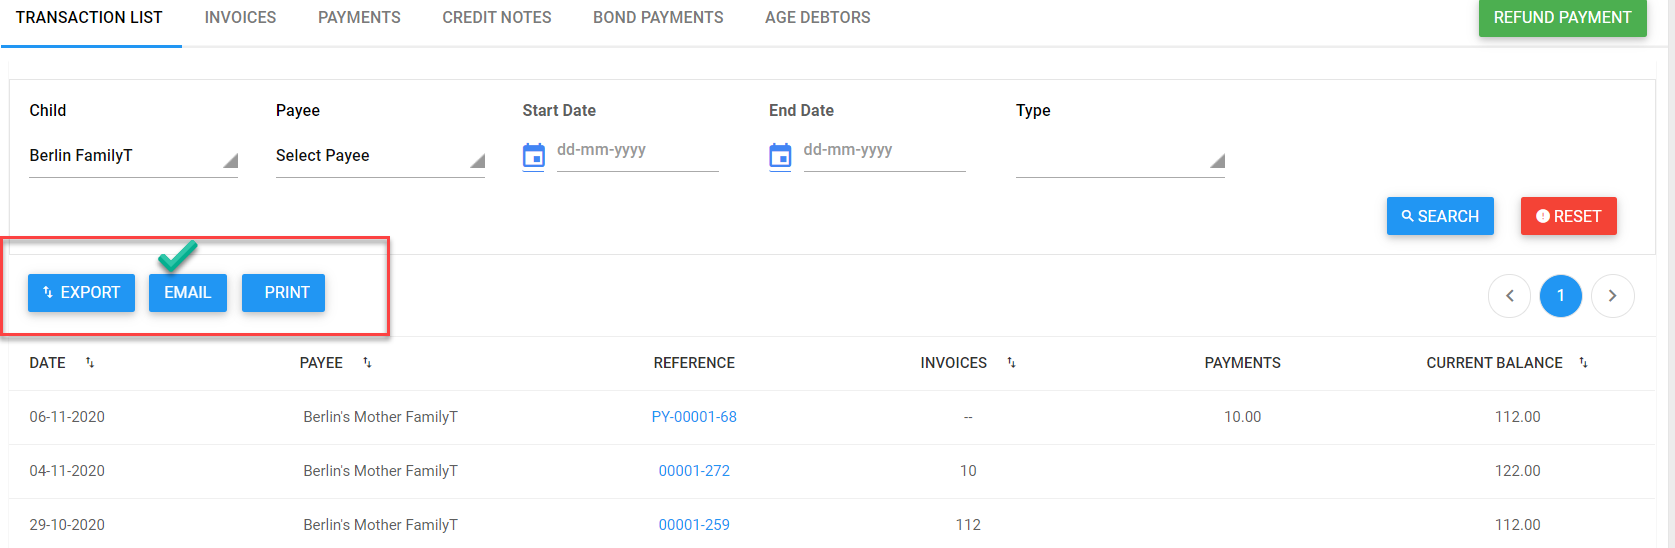
- Print, Email and Export options are available for extracting the transaction list further.
- Print and Export will allow you to print the list and export it out to Excel.
- Email option will allow you to send the list in an email to the parent/payee.
To advise any payees whose accounts are in credit, create a credit note.
Login to Juniorlogs SMS
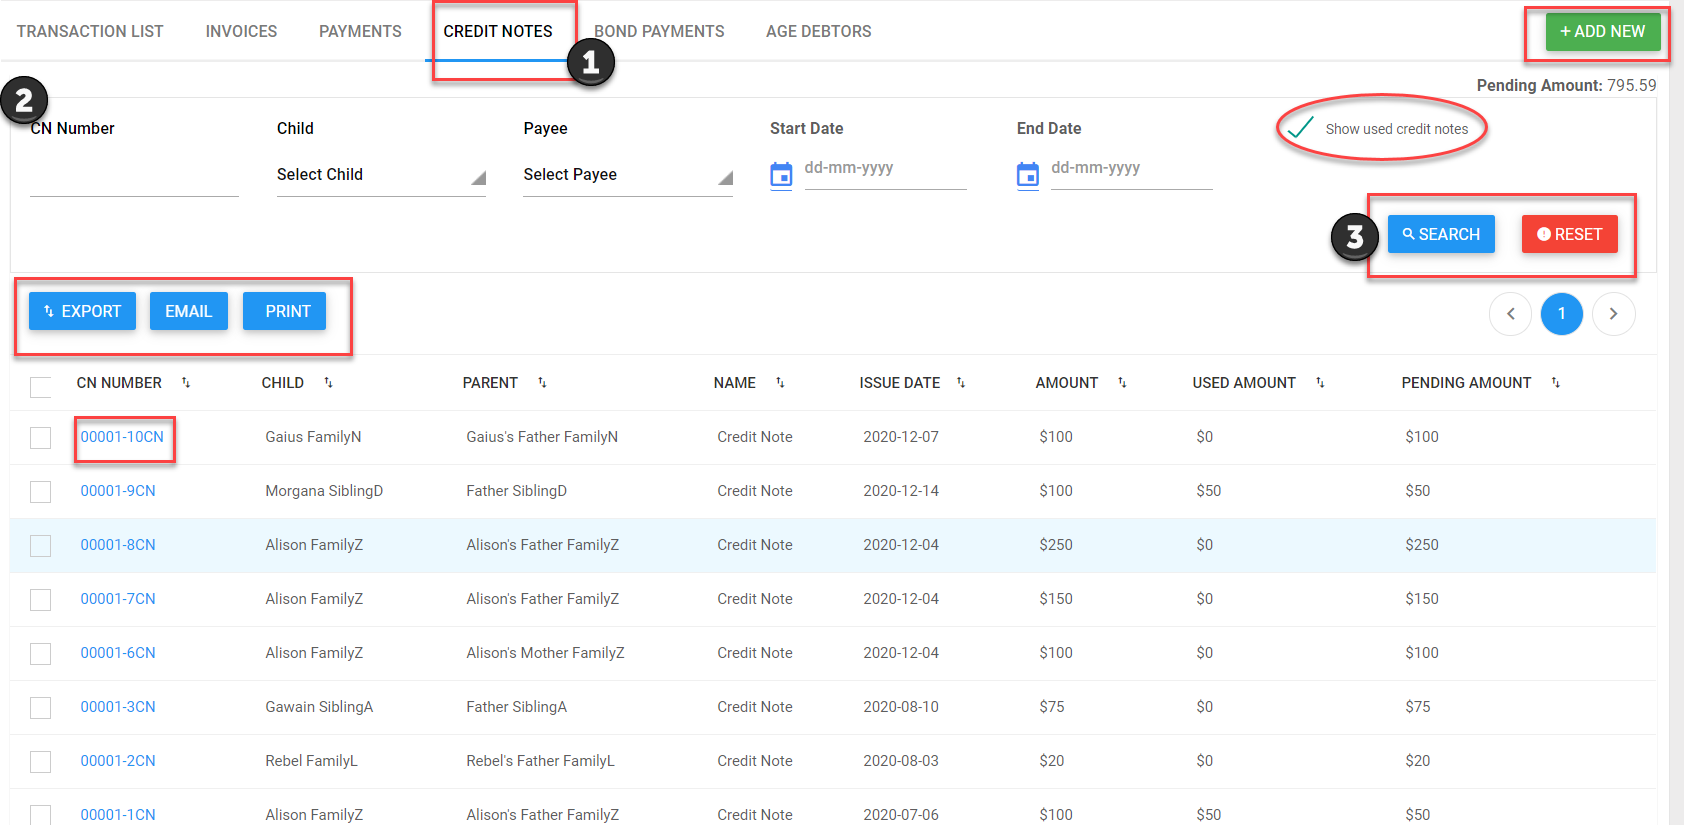
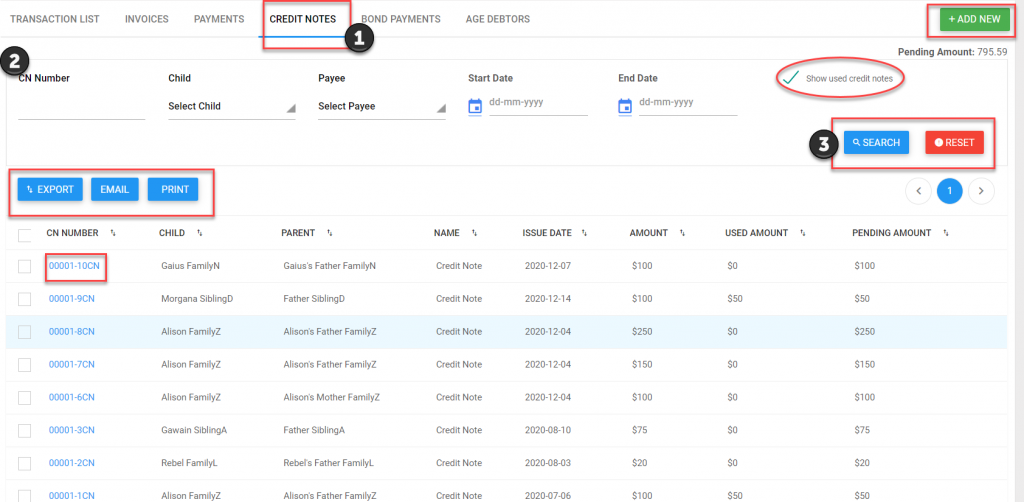
Menu > Finance and Accounts > Accounts > Credit Notes tab
- Select the filters and click Search
- Click on “Show used credit notes” to view used credit notes
- Click on CN number to view the credit Note
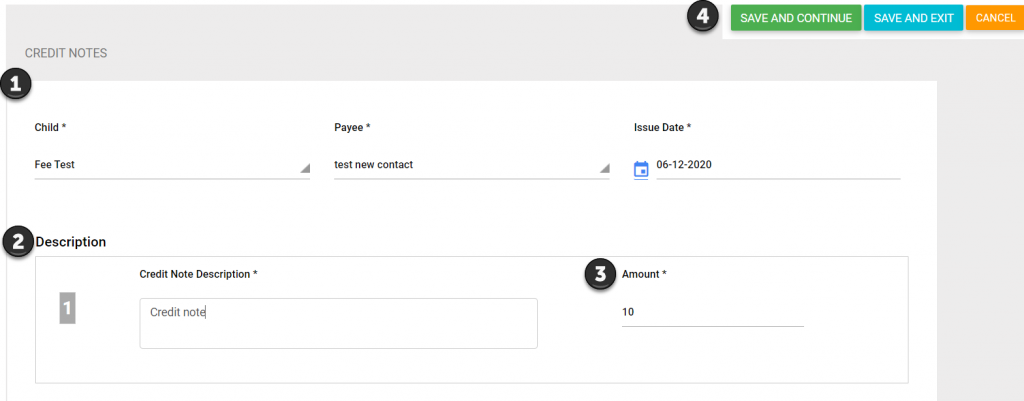
How to add a credit note
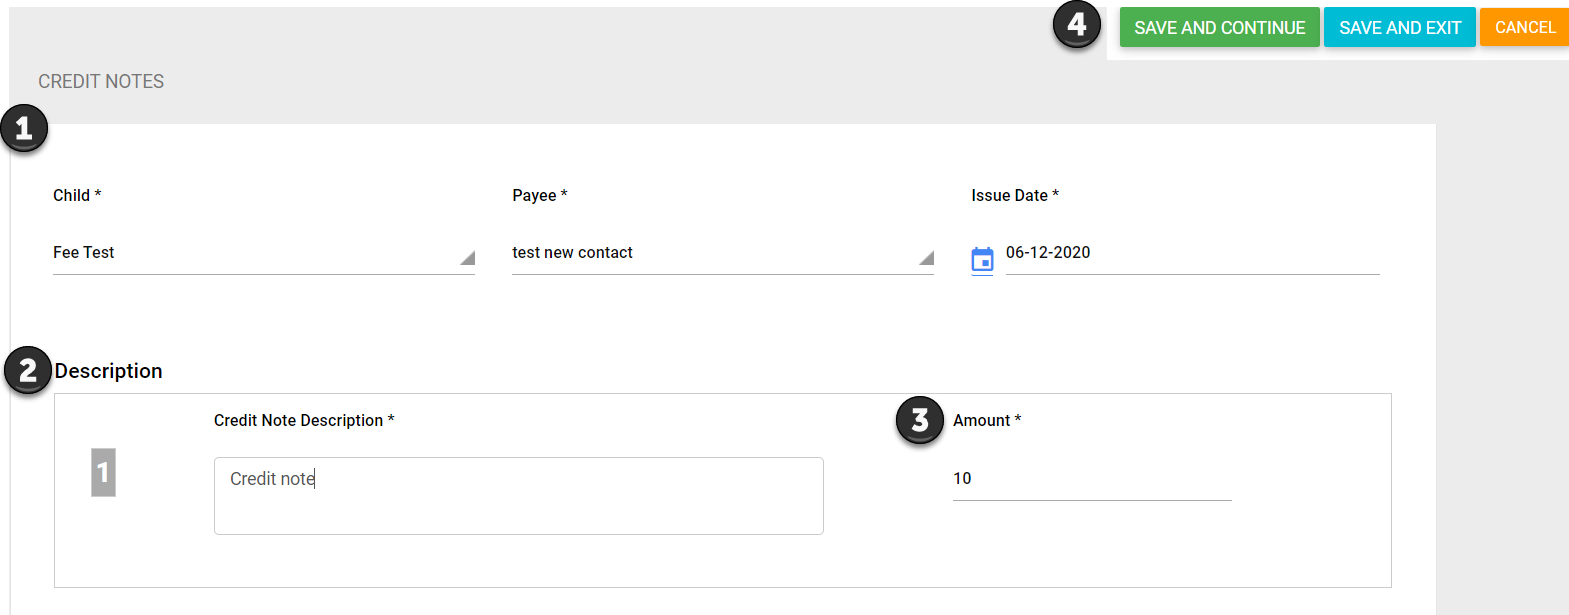
- On Credit Notes tab > Select Add New button
- Add Child, Payee, Issue Date
- Description
- Amount
- Save and Continue
2. From The Invoices:
- When receiving payments that are more than the due amount, you will have an option to save the surplus amount as a credit note.
- A check box with a description will ask if you would like to use your in-credit amount
Under Invoice tab > Select Invoice Number > Receive payment > Tick Checkbox Allocate from credit note on the pop-up > Add
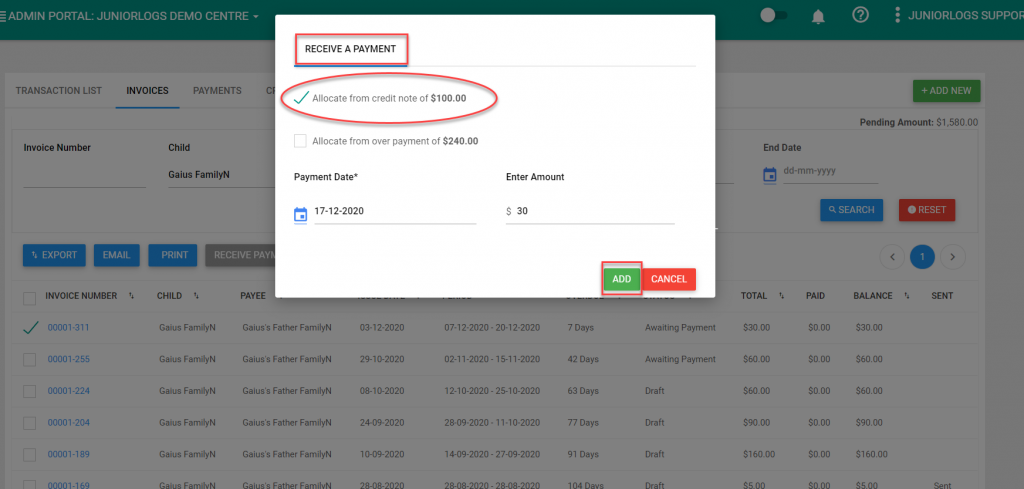
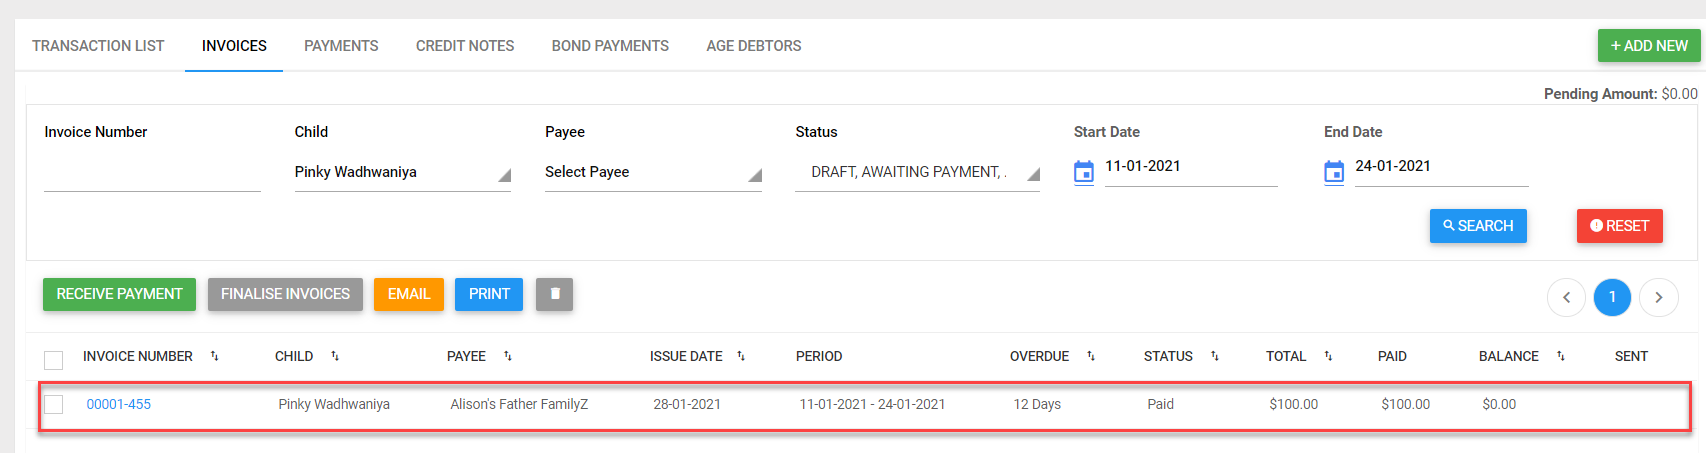
Credit note payments will be deducted from total pending payment amount and the invoice will be updated as follows
Menu > Finance & Accounts > Invoices
- Receive payment for any invoice.
Under Finance & Accounts > Update /Recreate Invoice
- Select the invoice period and child name of above paid invoice.
- Click on Update/Recreate Invoice
Warning message is displayed, if the invoice for the selected period is in paid status.
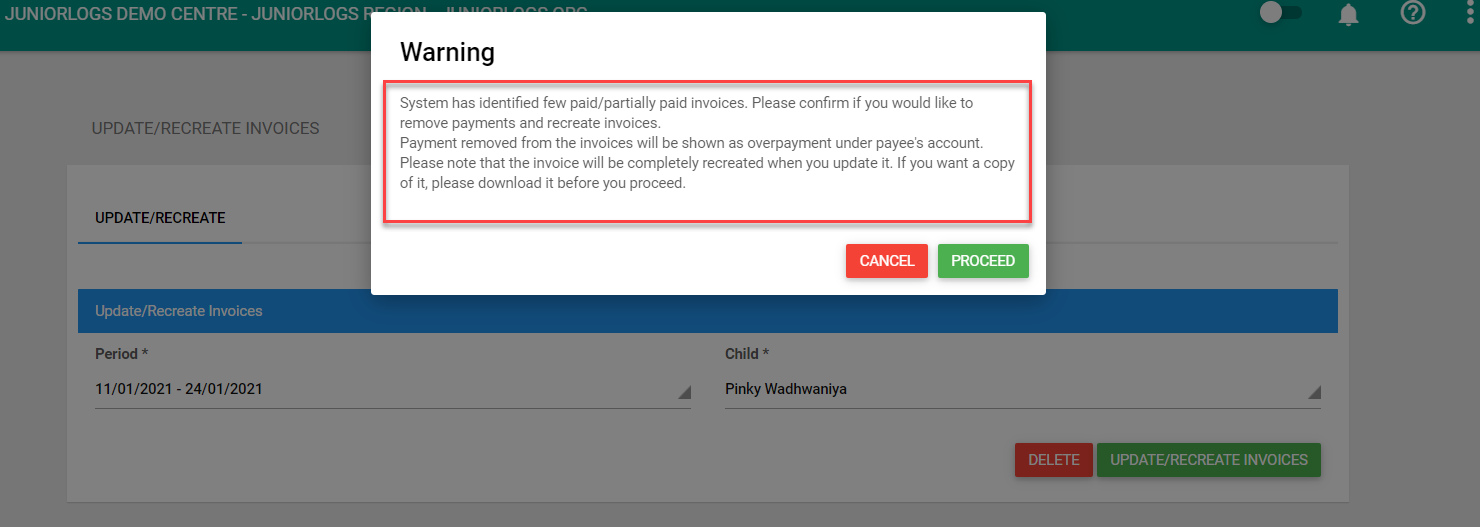
Click on Cancel button to cancel recreating invoice
Click on Proceed button to update/recreate invoices.
- This will remove the payment and update/recreate and the invoice is in Awaiting Payment status.
- If payment reference on the invoice is removed, the received amount is treated as overpaid.
- If the invoice was paid using a credit note, the removed payment will be seen under credit notes
Menu > Finance & Accounts > Invoices Tab
Select filters and click on Search button
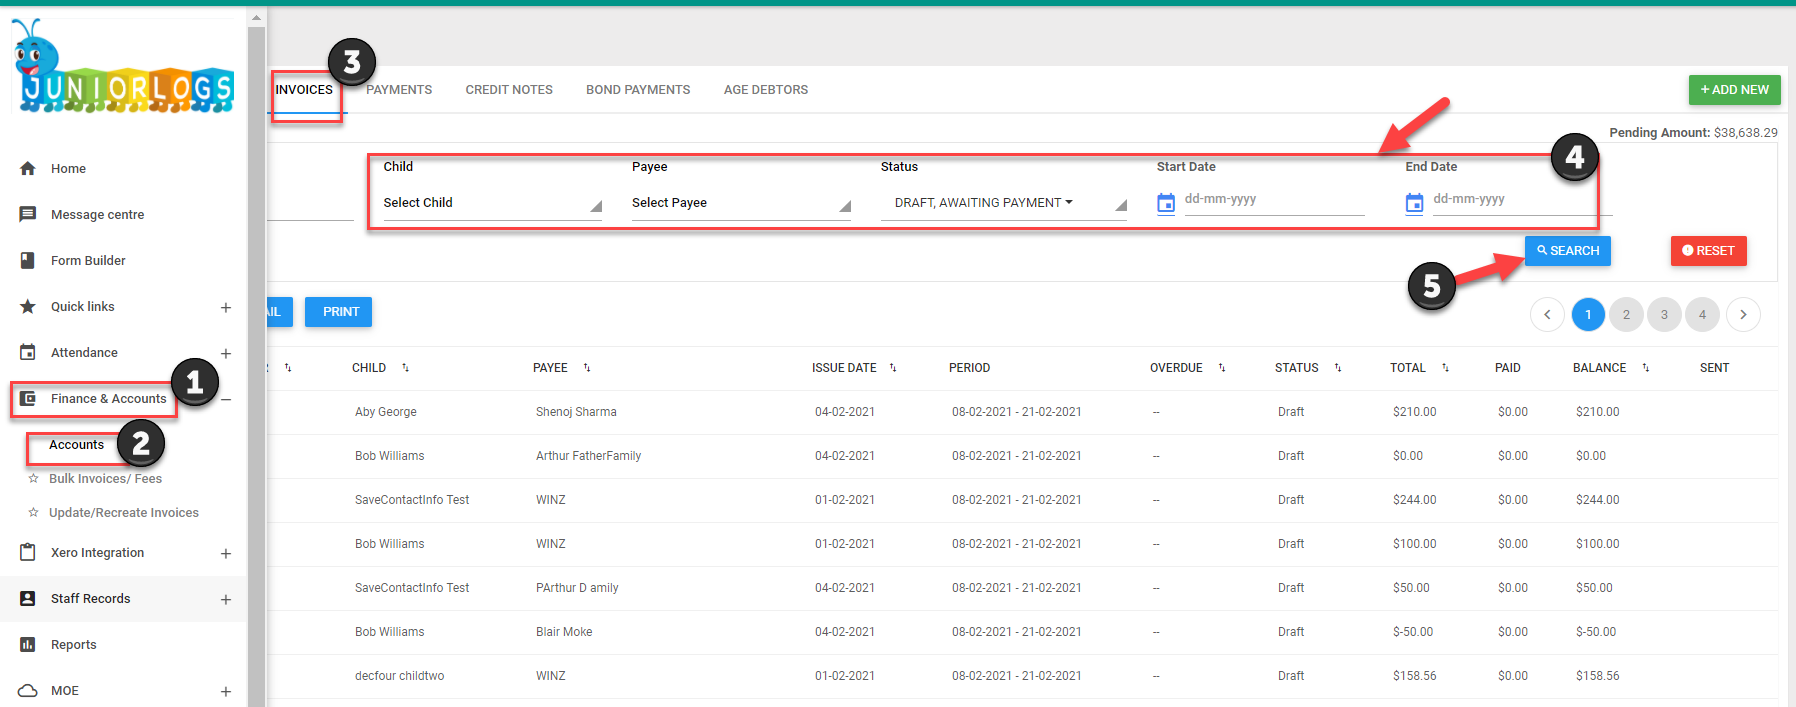
Print, Email and Export options are available for extracting the Invoices further.
- Print and Export will allow you to print the invoices and export it out to Excel.
Email Invoices to parents;
- Email option will allow you to send the list in an email to the parent/payee.
- Select Invoice number checkbox and it will select all the invoices on the current page
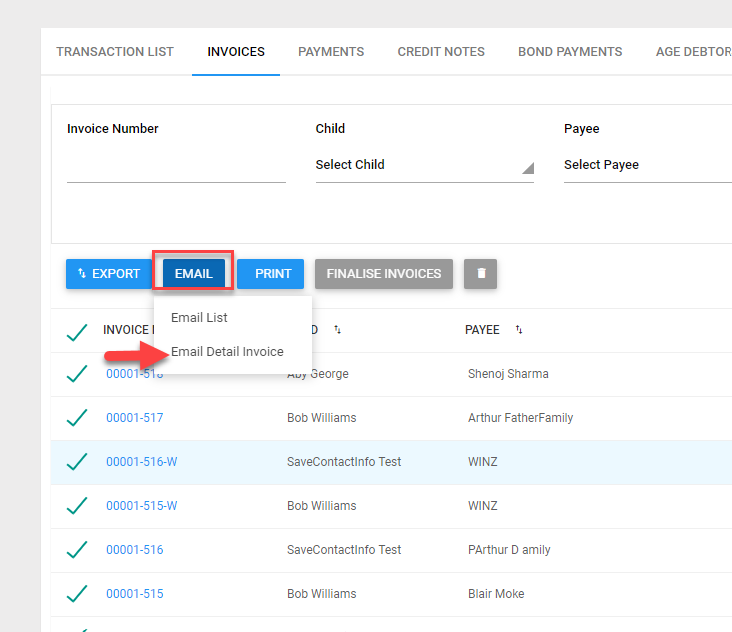
Selecting Email button > Email Detail invoice
- Selecting will give you pop-up which includes Invoice number/ Payee name / Payee’s email id
- You can change Invoice footer or keep the same
- Send button will send invoices to the email id’s present on the list